Articles, products, and services offered on this site are for informational purposes only. We are part of the Amazon Services LLC Associates Program, an affiliate advertising program. Amazon.com is compensated for sales resulting from links on our website.
Please review our disclaimer before acting based on anything you read or see.
It may seem daunting, but there are a few simple steps to do it right. You will need to plan your system and then carefully route all the plumbing in order so that you can avoid any problems with pressure drops or clogs. Once you have everything planned out, it is time to layout your equipment pad and start connecting everything together. In this article, we will teach you how to route the pool’s plumbing and setup equipment pad. You will need a shovel, trencher machine, hose clamp pliers, concrete mix or cement bags (depending on how permanent your installation is), water hose, and spray nozzle. We hope you find these tips helpful!
The next step is installing safety features like a filter skimmer, gas heater guards, or cover for the heat pump unit. Lastly, don’t forget about lighting! Now let’s dive into details of this process.
Read More: How To Install A Sewer Cleanout
How to Route Pool’s Plumbing and Setup Equipment Pad
The following diagrams serve as general examples of how you can route your pool’s plumbing and set up a buffer for your equipment.
Skimmers and return points must be placed consciously. For example, if you have a prevailing wind that is usually blowing from one side of your garden, you will need to put the skimmers aside to allow water to flow into the skimmer.
A little-known fact is that pool water naturally moves counterclockwise. Therefore, the return flows (also inlets) are equipped with adjustable “eyeballs” so that you can adjust the water direction even after installation and improve the water circulation.
Any newly installed residential pool must have main drains installed by the Virginia Graham Baker Pool and Spa Safety Act.

ROUTE YOUR PLUMBING
1 Skimmer, 2 Main Drains, & 2 Returns

1 Skimmer, 2 Main Drains, & 3 Returns

2 Skimmers, 2 Main Drains, & 3 Returns

Equipment Pads
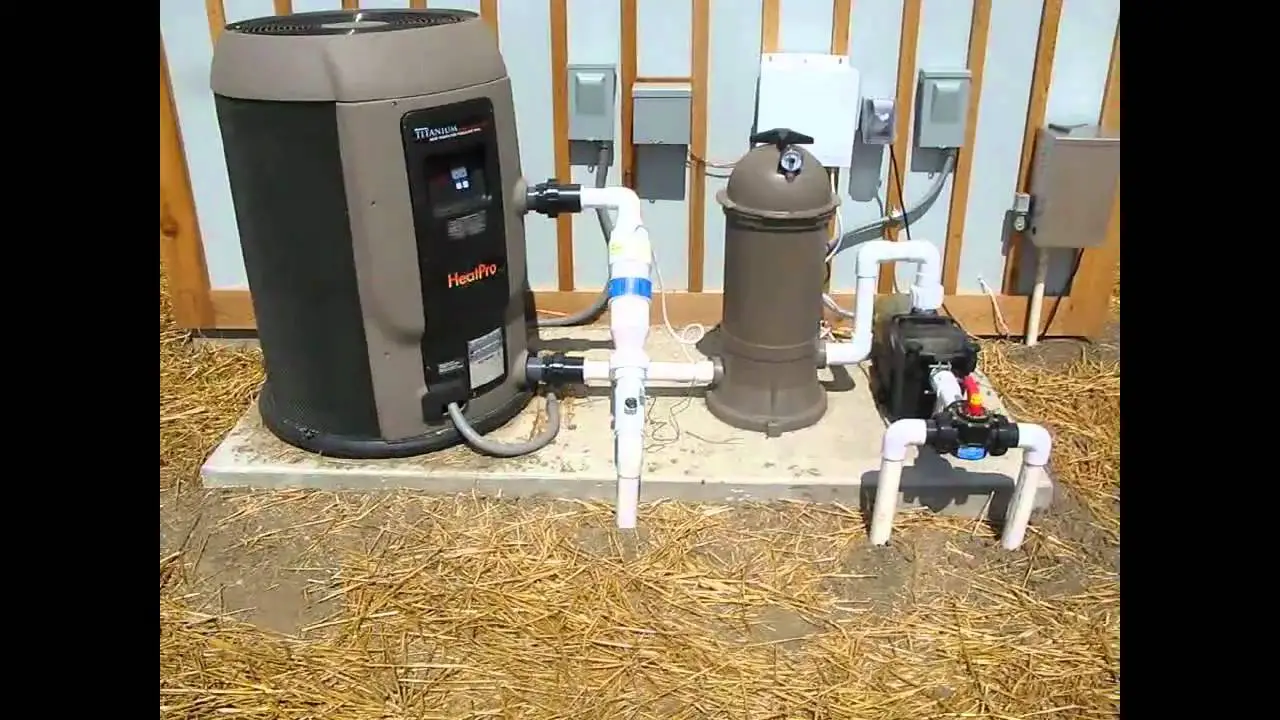
Below is an example of how your pool’s filtration system can be configured. Of course, depending on what gear you have, this set will be different, but it should give you a good idea to help you move forward.

Benefits of a Variable Speed Pool Pump
If you are building a pool, choosing the pump that will serve as the heart of your pool’s circulation and filtration system is one of the most important decisions. While it could be enticing to purchase the least expensive pool pump that accommodates your pool circulation, it may be a smart thought to look somewhat greater. For example, a variable speed pool pump is an excellent choice for a pool pump and may not be standard for all pool owners. Variable speed pool pumps are more expensive than one or two-speed pool pumps, but their added features and long-term energy savings generally make them the best choice.
Here are some tips to consider when deciding between a variable speed pump and a single or dual speed pump.
Energy Consumption
Variable speed pumps are more efficient than dual-speed or single-speed pumps. However, fixed-speed pumps cannot adapt to your pool’s real-time requirements, so they must always turn off their full power.
In most cases, the need for filtration and circulation of water in your pool deck will be minimal. A variable speed pool pump can adapt to this in real-time. They dynamically adjust flow rates, so you don’t have to pump large amounts of water through your installation when you don’t need that much water. In addition, when high power is not required, output allows variable speed pumps to use up to 90% less energy than fixed speed pumps. The long-term savings can be impressive, especially if your electric bill is already expensive.
Manageability
Due to limited operating modes, you only have two options for single-speed, two-speed pumps: on or off. If you do not intend to use your pool pump all the time, you will need to purchase a separate and expensive timer to turn the pump on and off for you.
Noise
The one- and two-speed pumps always run at high speeds and make loud noises that can sometimes be annoying to you, poolside guests, and even your neighbors, in addition to applying noise-reducing materials around it. Unfortunately pump; there is not much you can do to reduce the noise of fixed-speed pumps. However, a variable speed pool pump allows you to adjust the output power of the pump; if you want to reduce the noise level of the pump, you can simply reduce the power, and the noise will decrease by itself.
Underground Plumbing Leaks
Check the water meter.
Can you feel the current under your house?
Start by turning off all water, including faucets, toilets, washing machines, and so on. Then check the water meter scale to see your current position and wait half an hour before checking again.
If there is a change of position, it is a sign that there is a water leak that needs to be repaired. Keep in mind that groundwater leaks can be rare, but they can occur.
This can happen, for example, if the ground level in the basement is high during construction, especially when using backfill soil.
Check your water bill.
Check your water charge routinely to decide whether there is an underground break. For example, if you use a constant amount of water in your home every month and see an increase in water the next month, then there is a water leak somewhere.
Make sure that the water bill is based only on the water flowing through the meter. When you notice such a change, it is recommended that you hire a plumber to perform the inspection and confirm it for you.
Check your property
If there are groundwater leaks, you should check for them when checking your property. As you are probably already aware, water expands by approximately 9% when it is frozen; therefore, anything that is full of water and freezes can potentially be damaged.
For example, are there random pools of water in the area? Are there green spaces in the garden? Does your house smell musty? Is mold growing in your home? Any of these indicators is a sign of leakage that requires immediate attention.
Plumbing your Equipment Pad
- Locate the airflow and maintenance equipment.
- All pipes coming out of the ground must be the same height.
- Use as little as 90 seconds to reduce resistance.
- Leave room for future expansions.
- You can run a pipeline for later use, shut down from the buffer.
- Remove the leads from the electrical box.
The equipment plate is preferably a reinforced concrete plate, but strong HVAC plates on a 4″ thick gravel base can also be used. Install the pump, filter, heater, etc., in the equipment buffer logically, leaving enough space for further repairs or maintenance. Also, take a look at all the codes that are possible for placement. There are special installation requirements for gas heaters or heat pumps.
Now;
You’ve run all the lines from the pool to the deck, it’s time to hook up your gear. Let’s start with the bomb. Install a PVC fitting (not shown) for the pump and connect a small piece of equipment pipe through it to the Jandy 3-way valve. Connectors are useful for easy removal of the pool pump for winter service or indoor storage. If desired, check valves can be used, especially if the pump and filter are more than a foot above the water level. Using a variable speed pool pump can reduce your annual energy use by as much as 70 percent.
Clean and glue the main drain tube on one side of the valve and the skimmer on the other side of the valves. If there are two skimmers, second 3-way valves should be used. After the pump, install the coupling and route it to the pool filter inlet. If you have other accessories, after placing the connection, switch to the filter here and then attach it to the heater, heat pump, brine system, or whatever, and from there, the Jandy 3-way valves. Nozzles work on one side of the valves and return fittings on the other side.
How to Move Pool Plumbing to a New Location
If your pool system consists of a pump and a filter, only 2 pipes and a return pipe lead into the pump in the opposite direction, the movement of the pool is much easier than with large pools with many pipes, gas heaters, etc.
But it’s not easy either. So are we going up the stairs, yeah?
- Choose a new locationand fill the oversized concrete area.
- Dig a deep pit from the old mat into the new one.
- Remove and disconnect the pump, filter, and other equipment.
- Lower the water level in the pool or pool connection.
- Dig, cut, and run the suction and return pipes to the trench.
- Attach the old washer to the new one with the push-in fittings.
- Connect the pump and filter system to the new device.
- Fill the pool and test the pressure before filling.
You can leave the junction box, timer, and pool light switch in their original position, but most people will also move the power supply to the new location. In either case, use a qualified electrician to do most of the work to ensure that it is done safely by regulations. For example, an electrician runs new cables from old to new and installs waterproof sockets.
How to Route Pool’s Plumbing and Setup Equipment Pad: FAQs
What type of PVC is used in swimming pool pipes?
PVC – Rigid PVC (polyvinyl chloride) pipe is the standard for swimming pool piping and many other plumbing jobs. The pipe pool wall thickness is standard; the most common PVC pipe is standard 40 or standard 80.
Are main drains needed?
An indoor pool does not need large drains, but they are highly recommended and can be very helpful in certain circumstances. The advantages of basic drains are that you can empty your pool without using a pool pump. This is useful when replacing the pool liner.
How thick should the pool equipment pad be?
Pour with a thickness of 4 inches. Use a 2×4 section to smooth and polish the concrete, and when the entire frame is full, use a flat spatula to smooth the surface.
How close can the pool equipment be?
Stay near the pool. Typically, the average distance between the pool and equipment is 20 to 40 feet, but as mentioned earlier, sometimes much greater distances are required.
What pad size do I need for my pool equipment?
In terms of hardware pad size, you generally want a buffer size of 4 x 8 feet. This will work for your pump channel, warmer, salt framework, and whatever else you may use. In the 21st century, they are more likely to feature state-of-the-art sanitizing technology, such as salt-chlorine generators, ozonators, and ionizers. Once you are not using a heater or warmth pump, the support might be more modest, say 3 x 5 feet.
Can I place my pool equipment underground?
And that can increase the need to make the most of the space. Again, going underground with your equipment is ideal as it vastly expands the area at your disposal. Finally, the equipment hopper offers maximum protection from the elements.
Is it easy to move the pool pump?
Moving a pool, pump, filter, and heater to a new location is neither cheap nor easy. We typically charge between $1,000 and $3,000 for most moves, depending on how complex your system is and how advanced it is. But, of course, if there is no gas stove to move, the cost can be significantly lower.
Last Words
Setting up the plumbing and set up equipment pad for a pool can be tricky. If you’re not sure where to start, we have compiled this handy guide to help get things going in the right direction. We provide step-by-step instructions on how to layout your pipes and pumps along with what order they should go in so that water circulates properly throughout your swimming area. It also includes helpful tips like how deep each pipe needs to be buried below a ground level based on its size as well as sizing charts for all of our fittings. Not only will these tips make setting up your new pool simpler than ever before, but it will save time and money too! Hope you have learned how to route pool’s plumbing and setup equipment pad.
Comments are closed.