
A garage door sensor is an essential safety feature of a garage door that detects if there is an object or person in the path of the door while it is closing, preventing accidents and property damage. However, if the sensor starts blinking red, it can indicate a problem with the system that needs to be addressed.
In this article, we will explore why a Genie garage door sensor may blink red and what steps can be taken to troubleshoot and fix the issue. Whether you are a homeowner or a professional garage door technician, understanding the causes and solutions of a blinking red sensor will help ensure your garage door operates safely and efficiently.
Why is the Genie Garage Door Sensor Blinking Red

Sensor misalignment
If the garage door won’t close after you’ve tried to close it, sensor misalignment, as indicated by a flashing outer LED light, is most likely to blame. If the sensor is working properly, it will glow green. When the light turns red, all sensors go out of sync. When a garage door opener flashes red, it usually means that one or more sensors have moved.
Check the sensor’s mounting bracket or see if you need to tighten a screw. The problem was resolved when the garage door stopped blinking and closed normally.
Dirty Lenses
When sensor lenses are dirty or have spider webs, opening and closing a garage door may have trouble. As a result, the red light may flash on the garage door sensor.
However, there is a straightforward solution to the issue at hand. There is little uncertainty regarding how to clean something. They may regain full functionality after you wipe them with a clean cloth. If you reside in a dusty region, you may need to clean more often than usual.
Damaged Wires
A wiring issue may cause a blinking red light on the garage door and the operation of the safety reverse mechanism. The cables that connect the sensor’s system may deteriorate over time due to vermin, wear, and tear, or exposure to the elements.
Check out if anything has signs of abuse, such as water damage or chew marks. Consequently, you must install new wiring.
Damaged Sensors
As with the rest of your electrical equipment, your door sensors will eventually wear out. Examine your garage door opener for frayed wires or sensors, especially if you’ve owned it for more than five years or if it stops working suddenly. The average sensor has a lifespan of three to five years. Replacing the defective sensors will solve the problem.
Moisture
When the overhead garage door sensor receives water from sprinklers or rain, it blinks red. Always keep your garage door’s sensors dry and dust-free to avoid problems.
How to Check the Garage Door Sensor?
You can test the effectiveness of your garage door sensor now that you understand how it works. Determining if the garage door sensor is faulty is fairly straightforward. Once you determine the sensors’ issue, the solution is often fairly easy to do yourself.
To test a garage door sensor, you need an everyday object like a cardboard box. Place the box in the line of the sensor and try to close the garage door. If the door turns over after detecting an obstacle, your door is functioning properly. If the door closes behind a drawer, you must troubleshoot and look for signs to determine what is wrong with the sensors.
You can troubleshoot if your garage door sensors malfunction to determine the root cause. Several signs can help you identify the underlying issue with your garage door sensor. After checking them, you can fix the issue or contact a professional. Look for these three signs:
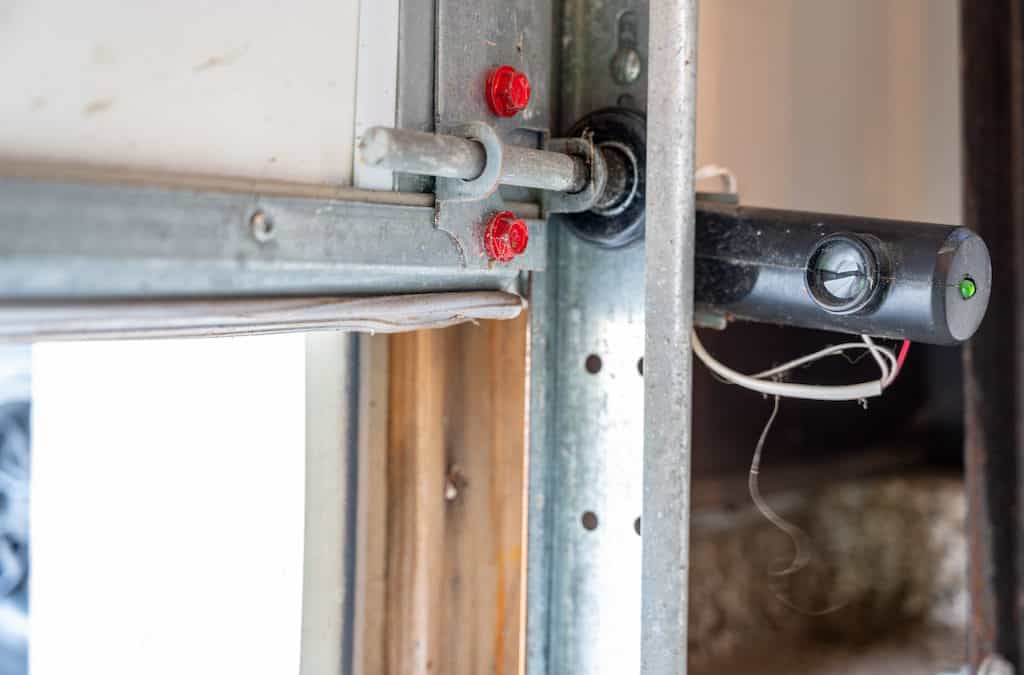
Indicator Lights
An easy way to tell if your garage door sensors are not aligned is to check if the external LED is flashing when you close the door. Green LEDs indicate that the sensors are working, and red LEDs indicate that the sensors are not aligned. Check the bracket or tighten the blink sensor’s screw if you notice a red light. You’ll know you’ve fixed the sensor if the light stops flashing and your garage door closes properly.
Dirty glasses
Sometimes only a clean rag is needed to repair garage door sensors. Touch lenses may not work when dirt or cobwebs block their view of the garage door opening. By wiping the lenses, the door can work normally. You should regularly clean your sensors if your garage is extremely dirty or your area is known for dust.
Damaged Wires
The wires connected to the garage door sensor system can wear out due to regular use, weather conditions, and even noise. Rain and wind, pest infestations, and tools can affect the wires. Check the wires for water damage, chew marks, or other signs of tampering. You may need to replace it if this is the case.
Learn More: How To Wire Garage Door Sensors
After completing these steps, check the garage door again with another cardboard box. This test provides an easy way to determine if you have fixed the issue or need to call a garage door specialist.
What are the Steps for Replacing Garage Door Sensors?
The replacement is not difficult and will only take 15-20 minutes. To replace garage door sensors, you need the following tools:
- Stairs
- Pliers
- Work gloves
- Tweezers
- Protective glasses
- Blue wire nuts
Cut the cable to start replacing a garage door sensor

Screw the nut to take off the sensor

Remove the sensor’s base

Split the cables and prepare them for the new sensor

Split the cables of the new sensor and put them together properly

Find the black cable to put them together

Split them up to avoid contact between them and prepare some tape

Be sure that the light stays steady

Please put it back into place by pushing it a little

How to Prevent Genie Garage Door Sensor from Blinking Red
You can do these things to prevent damage to your garage door sensor and the entire system:
Check the system’s alignment.
First, ensure that everything is ok. All garage door opener brands include standard LED lights on door sensors. LiftMaster will display two lights, one green and one yellow. So, Genie may possess two reds, one red and one green. Lift Master’s rivals are Chamberlain and Craftsman.
A green light illuminates each unit in a linear array, and a red light illuminates one. If only a single light fails to illuminate, it is most straightforward to examine that sensor. Although you will need some fiddling, you should eventually be able to turn on and maintain the light’s illumination. The lights won’t flicker or blink.
Check the wiring
If adjusting the sensor does not resolve the problem, examine the wiring. Animals or insects are typically to blame. They have a peculiar fixation on chewing on these wires. The safety of your pet will be ready. If you encounter a severed wire, you should attempt to reconnect it.
You can reconnect the wire, or the broken section can be removed and discarded. If your garage door’s wiring is concealed behind a wall, you may need to contact a repair service.
Replace sensors (if necessary)
The sensor may be at fault if you cannot locate a frayed wire. These can be ordered online and are simple to install. Ensure you purchase the correct brand and model. Contact your local garage door repair service to schedule an appointment if you are unsure how to use common hand tools.
How to Reset Genie Garage Door Sensor
Remove the plastic covering the bulbs near the antenna.

You’ll find a button next to the blinking led; press and hold this button until the led stops blinking; this will clear the memory and allow you to reprogram your remotes.

After pressing and releasing the same button, it will blink for 30 seconds; during this time, press the same button three times to set the code and try it.

Consult the owner’s manual for your genie intellicode garage door opener if these instructions do not work.

How to Troubleshoot a Red Blinking Sensor
The below steps should resolve the majority of blinking sensor issues.
- Initially, adjust the sensitivity of your sensors.
- Check and inspect the cleanliness of the sensor’s lenses.
- Third, make sure the sensors’ path is clear by inspecting it and removing any obstructions you find.
- Clean the sensor’s surrounding areas.
After identifying the source of the problem, test the door opener and sensors. Place cardboard in the garage door’s path and observe its reaction. If it goes normally, the sensor will cease flashing red, signifying that the issue has been resolved.
Frequently Asked Questions
Can I bypass the garage door sensors?
Keep the wall button pressed (do not press or release). Hold the wall switch until the garage door hits the ground, then release it. If you release the button before the door hits the floor, the sensors will work again, and the door will open.
Does the Genie garage door remote include a reset button?
Most garage door openers are easy to reprogram, and most garage door openers can be reset using a simple procedure. DIP (two-line dial) switches and radio frequencies operate older garage door openers. Newer models, on the other hand, often use wireless technology.
Why doesn’t Genie’s garage door close?
A clogged channel between the sensors, dusty eyeballs, loose wires in the sensors or the motorhead, or damaged sensors is all possible causes. The transmitters (remote controls) do not operate to close the garage door. You can also try unplugging and replugging the garage door opener’s remote.
Is it compulsory for my Genie garage door sensors to be green?
An infrared beam of light is used to operate garage door keypad sensors. A light is usually present on each sensor. One will show a green light to indicate that the devices turn on, while the other will be red to signal that there are no constraints between the sensors.
Is there a reset button on the Genie garage door control?
For at least 3 seconds, press and hold the square “Install Program” button. Keep the button pressed until the round LED lights up. The oblong LED next to the circular LED will flash purple. This will put your opener into programming mode, allowing you to reset the device.
Conclusion
Garage door sensors are an important component of the garage that can malfunction and endanger your safety. If you cannot handle the problem independently, you may need assistance from a professional garage door service.

